Atel Lights M-12


Atel Lights M-12
- 3 different channel settings
- 10 – 12 subs
- 12 speed potentiometers / 1 master chaser potentiometer
- 4-knob keyboard
- LED indicator for each output
Do you have questions or want to order by phone?
Καλέστε μας στο 210 21 30 405 & 210 21 30 406
Related Products


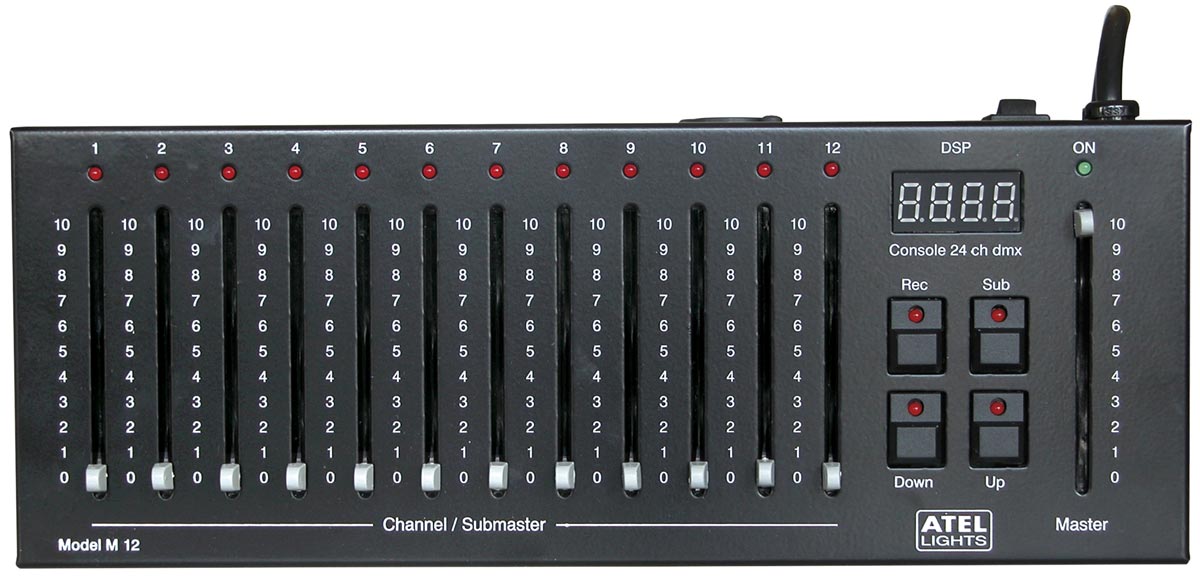
Professional console with selectable modes: 24 channels – 12 subs (scenes) or 30/80 channels – 10 subs (scenes) – 1 chaser
Specifications
- 24/30/80 Channels
- 10 – 12 Subs
- 1 Grand Master fader
- 12 potentiometer speed
- 1 potentiometer Master Chaser
- 4 Knobs Keyboard
- Led Indicator for each output
- ON/OFF Switch
- 3 pin XLR connector for digital output DMX 512
- Main Power Fuse 200mA internal
- Power Consuption 2 W
- Power Supply 230V / 50-60 Hz
- Dimentions ( W x H x D ) 282 x 55 x 112 mm
- Weight 1.23 Kg
User Manual
The M12 console features 3 different channel settings:
- 24 DMX channels + 12 SUBs
- 30 DMX channels + 10 SUBs + 1 Chaser (20 steps)
- 80 DMX channels + 10 SUBs + 1 Chaser (20 steps)
The M-12 console is powered via a Schuko plug.
The DMX connection is located on the rear panel and is made using a male 3-pin XLR connector:
Pin 1 is ground (0), pin 2 is (-), and pin 3 is (+).
To select the channel setting on the console, press and hold the Up and Down buttons simultaneously and then turn on the console using the PWR ON switch. When the console powers on, the display will show the current channel mode. Use the Up and Down buttons to select the desired mode: 24 / 30 / 80 channels. Press the Rec button to confirm the selection.
By adjusting the Master potentiometer, you can control the overall light intensity. The first two digits of the display indicate the channel being controlled, while the next two digits indicate its brightness level (e.g., <01.50> means channel 1 at 50% brightness). Pressing the Up and Down buttons allows you to scroll through channel pages, which will be shown on the display.
In the 30- and 80-channel settings, channels 11 and 12 function as Speed and Chaser Master, respectively, while in the 24-channel setting, they function as regular channels.
Once you have configured your lighting and wish to save scenes (SUBs), press the Rec button. The display will show (first scene). Use the Up and Down buttons to select the scene number you wish to record, with a maximum of 12 scenes (SUBs). Press the SUB button to complete the scene recording. To play a recorded scene, press the Sub/Enter button and raise the corresponding potentiometer. Use the Up and Down buttons to view which channels are used in each scene. Scenes can only be deleted by overwriting them.
The console allows you to create a Chaser with up to 20 steps. After configuring the desired step, press the Rec button twice. The display will show . Use the Up and Down buttons to set the step number. Press the Sub/Enter button to save the step.
To activate the Chaser, raise the Chaser potentiometer, and use the Speed potentiometer to control the transition speed between steps.
To permanently delete the Chaser, press and hold the Rec button for 3 seconds. The display will show and you complete the deletion by pressing Sub/Enter.
The console can operate both SUBs and the Chaser simultaneously.
-
ManufacturerAtel Lights